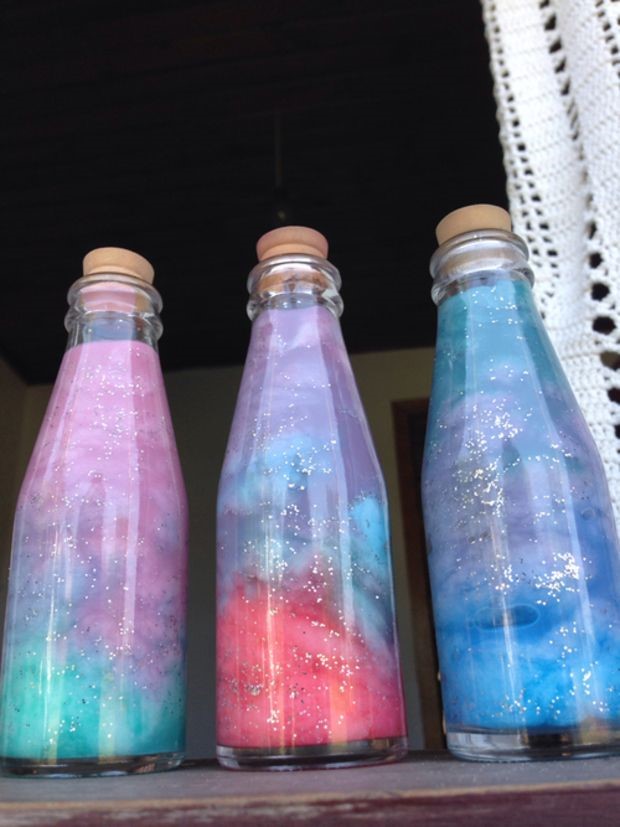
DIY Ocean in a Bottle

Hello everyone!

I think I just found the simplest DIY Pin on Pinterest! It uses three materials to create something cool and magical. A simple bottle with oil and water can transport you to another time and place, (where I’d certainly rather be!).

Original ocean in a bottle

I found instructions on: http://happyhooligans.ca/ocean-in-bottle/

So let’s get straight into it!

Supplies:

  • Water
  • Cooking oil (I used vegetable, but canola would work well)
  • Blue food colouring
  • Large bottle
  • Funnel

Method:

  1. Fill approximately 1/3 of your bottle with water.
  2. Add several drops of food colouring. Shake the bottle to disperse the food colouring.
  3. Now, simply top up the bottle with oil.
  4. Tip the bottle upside down and watch your ocean come to life.

The Results:

DIY ocean

Who knew such a simple DIY could be so magical.  I think I’m a bit bias due to me deep love of the beach and ocean but I was amazed by this Pin.  Though if I had to give one piece of advice it’d be not to go overboard on the food dye, because it can stop looking like the ocean….. whoops.

If you have any ideas or suggestions comment on this post and I’ll see if I can do it. Come back soon to check my next post.

-The Pin Tester

FEATHERS!

Hello everyone!

I just couldn’t scroll past this Pin.  I was simply captivated by the beautiful colours and cool tribal inspired patterns, I knew I wanted to try this.  I would definitely recommend trying this Pin, it also makes a beautiful display.

original feathers

I found instructions on: http://diyready.com/diy-painted-feathers/

So let’s get straight into it!

Supplies:

  • Acrylic paint
  • Paint brush
  • Feathers

Method:

  1. Dip your brush in the first color that you want and start painting. Continue painting with the color combination that you like.
  2. Let the paint dry and prepare your black and white paint to add some design.
  3. Start designing your feather. Add some line or whatever decoration you can think of to make it look more beautiful.
  4. Let it dry and you’re done!

The Results:

my feathers

I loved making this Pin. It was a great way to get some creativity out and create something beautiful. I bought a packet of white feathers so I could keep making more as I pleased. The hardest part was coming up with cool patterns for each feather, but a quick google search fixed all that!

If you have any ideas or suggestions comment on this post and I’ll see if I can do it. Come back soon to check my next post.

-The Pin Tester

DIY Bath Bombs

Hello everyone!

My latest obsession at the moment has the the store Lush and many of it’s products.  Lush is most known for it’s amazingly cool bath bombs with beautiful aromas.  So when I came across this Pin I thought I’d give it a go.

bath bomb

I found instructions on: http://diyready.com/how-to-make-diy-bath-bombs/                                                                                So let’s get straight into it!

Supplies:

  • 1 cup baking soda
  • 1/2 cup citric acid
  • 1/2 cup Epsom salts
  • 1 tsp. water
  • 2 tsp. essential oil
  • 3 tsp. oil (olive oil)
  • food colouring (any colour you want, but I choose blue)
  • whisk
  • jar
  • bath bomb mold

Method:

  1. Put all your dry ingredients in a bowl and whisk them evenly.
  2. In a different container, add all your liquid ingredients and mix them together.
  3. Put a small amount of your liquid mixture to your dry ingredients and mix it thoroughly. Mix until all the liquid has been absorbed by your dry ingredients. Continue adding small amounts of the liquid mixture until you’ve used it all up.
  4. Now that you’ve mixed all the ingredients together, time to put it in the mold. Put a little more than what your mold can hold on both sides and press them together until it clips. You’d want to put more so your mixture get pressed together making it solid.
  5. Once it’s pressed, gently tap it with a spoon to loosen your bath bomb.
  6. Let your bath bomb dry out for a couple days, then your done and can use it any time you please.

The Results:

DIY bath bomb

I made a couple bath bombs but I only took a photo of this one because it was almost perfect looking in shape and colour.  The scent isn’t the same as the amazing Lush products, but what did I expect?  All in all they turned out pretty well and would pair up perfectly with the face scrub as a gift to someone.

If you have any ideas or suggestions comment on this post and I’ll see if I can do it. Come back soon to check my next post.

-The Pin Tester

DIY Galaxy Slime

Hello everyone!

‘I am not a child!’ I tell my family while playing with galaxy slime. Well maybe sometimes it’s good to let the inner child in you out. In my opinion cating like a child, playing with slime and being running around outside are good ways to distract yourself from your real problems.

DIY galaxy slime

I found instructions on: http://www.two-daloo.com/night-sky-activities-preschool-galaxy-slime-borax-free/

So let’s get straight into it!

Supplies:

  • 1 bottle of Elmer’s Clear School Glue
  • Liquid Starch
  • Liquid watercolours
  • Glitter in a variety of colors

Method:

  1. Put the glue into three separate bowls. Then add a different coloured watercolour and your glitter and mix well.
  2. Now start adding your starch, (but just add it in small increments at a time) stirring well to mix after each one to incorporate your starch fully. After the first couple of additions you’ll need to use your hands to knead the starch in.  
  3. Keep adding in starch until your slime is a consistency you’re happy with.  
  4. Once you’ve completed the above steps for each bowl you can mix the colours together. To do this you’ll just need to play and knead the slime together.

The Results:

My slime

A lot of the time the DIY process isn’t too interesting or fun, but when making slime it’s almost as good as the final product.  I didn’t have any problems when making this Pin, but on the website I followed it made it clear not to put all the materials in at once otherwise it wouldn’t work.

If you have any ideas or suggestions comment on this post and I’ll see if I can do it. Come back soon to check my next post.

-The Pin Tester

DIY Bottled Nebula

Hello everyone!

This DIY is one of the first I found that inspired me to create this blog.  At the moment I’m taking an Astronomy class and anything related to it interests me.  The pictures are just so pretty, how could I go past it?

Nebula

I found instructions on: https://omghow.com/articles/make-bottled-nebula

So let’s get straight into it!

Supplies:

  • A transparent jar or bottle with a lid
  • Cotton balls
  • Glitter
  • Water
  • Food coloring or fabric dye, any colours you choose (but I think pinks, blues and purples look good)
  • A pencil, straw, or other small stick

Method:

  1. Make sure your jar is properly cleaned out then fill it with water up to where you want the first layer to end.
  2. Next, add the food coloring of your choice to the water, and mix it together with a pencil or straw.
  3. Now add enough cotton depending on the size and shape of your jar. Make sure to completely soak it in the dyed water and keep pressing down with your straw until the cotton fully submerged. Then add some glitter to the solution and shake it up so that the glitter spreads.
  4. Put more cotton on top of the first level, to create a second layer. Then make a solution of water and another color of dye in a separate container and pour that solution over the second layer of cotton. Then add more glitter and spread it around with a straw.
  5. Keep repeating the last step until you have many layers of color and your jar is filled to the top, then secure it with a lid.

The Results:

My DIY nebula

I was very happy and pleasantly surprised with how well this Pin turned out! I love the way it looks but I think if I included some larger glitter pieces (stars would be ideal) it would have just finished it off. This is my favourite DIY I’ve done on this blog, it’s so pretty and definitely not one I’ll chuck out.

If you have any ideas or suggestions comment on this post and I’ll see if I can do it. Come back soon to check my next post.

-The Pin Tester

Tie Dye!

Hello everyone!

I was feeling creative when I decided to try these out.  Tie dye is something that not everyone is into but at the moment has become increasingly more popular.  I saw a lot of tie dye on Pinterest when I was searching for inspiration and after contemplating trying it for years it was finally time.

original pin

I found instructions on: http://www.bystephanielynn.com/2015/06/tie-dye-folding-techniques-16-vibrant-tie-dye-patterns-tiedyeyoursummer.html

So let’s get straight into it!

Supplies:

  • A t-shirt or any fabric you want to tie dye (it’s a good idea to have multiple t-shirts and not use a t-shirt you really like because you might not get it right the first time).
  • Fabric dye in colours of your choice

Method (the method is only for the technique I used that worked best, there the the instructions to all the others on the linked website):

  1. Lay the fabric flat.
  2. Pinch the fabric in the center.
  3. Begin twisting the fabric in a circular motion and continue until all of the fabric is in a spiral shape.
  4. Secure the spiral with three rubber bands, creating a wedge effect, eg:
  5. step 4 eg
  6. Apply the dye to the fabric.
  7. Flip the fabric over and repeat on the backside.

The Results:

Tie dye tshirt 1 Tie dye tshirt 2

This was a Pin that I’d been anticipating for a long time.  I had high expectations was very enthusiastic when trying it.  This led to me getting a bit carried away and making a mess of my first two attempts.  I tried two different techniques before the two I showed above but neither worked.  Then ended up a brown mess, (which is why I only gave the details for the technique that worked well for me).  And a piece of advice, when trying this Pin don’t get excited and go crazy with the dye!

If you have any ideas or suggestions comment on this post and I’ll see if I can do it. Come back soon to check my next post.

-The Pin Tester

DIY Sugar Scrub

Hello everyone!

A friend of mine recently received an expensive face scrub as a gift and I had a feeling that I could make a similar product a lot cheaper and easy, (and I certainly could!).

sugar scrub

I found instructions on: http://www.reasonstoskipthehousework.com/sugar-scrub-recipes/#_a5y_p=3553203

So let’s get straight into it!

Supplies:

  • ¼ of a cup of Coconut Oil (melted)
  • ¾ of a cup of granulated white sugar
  • 2-4 drops yellow or red food colouring depending on what colour you choose

And if you want your scrub to have a scent:

  • 10-15 drops Lemon Essential Oil or 10-15 drops Raspberry or Vanilla Extract, depending on scent you want

Method:

  1. Melt coconut oil in microwave for 20-35 seconds until melted.
  2. Pour sugar into oil and mix. If too liquidy, add a small amount of sugar and mix.
  3. Add food colouring to make the colour you desire
  4. If you want it to have a scent, add essential oils or extract drops achieve your desired scent.

The Results:

                      DIY Scrub                                                      

This pin was extremely simple and quick.  It would make a good and easy gift, good for anyone (including yourself).  I’m not sure if it actually does help your skin as I haven’t tested it out properly but it certainly does taste good! (Warning, don’t eat too much it isn’t healthy!)

If you have any ideas or suggestions comment on this post and I’ll see if I can do it. Come back soon to check my next post.

-The Pin Tester

Phone Hologram Projector

Hello everyone!
I’m feeling very excited about this pin! I hadn’t seen this pin much but when I found it and looked into it, I was amazed!

image
I found my instructions on: http://m.instructables.com/id/Amazing-3D-Projection-Pyramid-in-10-min-from-Clear/?ALLSTEPS
So let’s get into it!

Supplies:
An old CD case
Stanley knife (or any other sharp, precise cutting material)
A ruler
A marker
Any sort of tape

Method:
1. Measure and mark a trapezium shape on the plastic cover with the measurements of 6cm for the base, 1cm for the top and 3.5cm high.
2. Cut out your trapezium then trace its shape three more times and cut them out too.
3. Once you’ve cut out all four sides then tape them together to make a pyramid, (it’s not supposed to join at the top).
4. Find a holographic video, place your projector on top of your screen and let it play.

The Results:

image
I loved this pin! The idea was amazing and the fact that it worked surprised me. If you do make this pin and want to test it out go onto YouTube and search ‘holographic videos’ and quite a few should come up. I suggest going through multiple of them because they’re all different and some work better than others. 100% I would recommend this to everyone with a screen and Internet connection. This pin made me feel like a child on Christmas Day.

If you have any ideas or suggestions comment on this post and I’ll see if I can do it. Come back soon to check my next post.

-The Pin Tester

Record Bowl


Hello everyone!
Recently I’ve had this obsession with cool retro things. Things like records and anything to do with them. So when I came across this pin I knew I wanted to give it a go.

image

I found instructions on: http://m.instructables.com/id/Vinyl-Fruit-Bowl/
So let’s get straight into it!

Supplies
A record (that you don’t want to listen to again)
A tray
An oven
A bowl

Method:
1. Preheat the oven to 100C.
2.Put the record on the tray, then place it in the oven for a few minutes. Take it out when it is floppy and you can bend it to different shapes.
3. To shape the bowl I placed it inside another bowl slightly larger than the record.
4. Once the record cools, it will harden into place and stay that way. If you’re not happy with it, just put it back in the oven for a bit and reshape it.

The Results:

image
This was a fun and simple pin and I love the way it turned out. You could use it for a practical purpose but I think it looks great as it is and should be displayed for all to see. I would definitely recommend trying out this pin. But if you do try it I’d suggest using gloves or oven mitts when dealing with the hot tray and record. This pin went exactly as planned but I like it because even if you do mess up you can just reheat it and do it again.

If you have any ideas or suggestions comment on this post and I’ll see if I can do it. Come back soon to check my next post.

-The Pin Tester

DIY Lava Lamp

Hello everyone!

Welcome to my first official post!  In this post I’m going to be telling you about my DIY lava lamp experience.  The pin I found was this one:

We re-did a favorite of ours...DIY Lava Lamps. All you need is 4 ingredients! It's lots of fun to watch and the kids love it! Jugglingwithkids.com

It didn’t look too hard for my first DIY and at the same time it still looked really interesting. So the website I got my instructions from was:
http://www.jugglingwithkids.com/2013/05/diy-bubbly-lava-lamps.html
It claimed that only five ingredients were used and that it was done with kids, so it can’t be that difficult.

Supplies:

  • A water bottle
  • A glass
  • Food colouring
  • Vegetable oil
  • Water
  • Alka selter

Method:

  1.  First I take the glass and fill it with water then add the food colouring of your choice.
  2. Then fill the water bottle about 3/4 of the way with the vegetable oil.
  3. Add the coloured water to the bottle making sure to leave at least 5cm at the top of the bottle so that when the alka selter tablets are added it doesn’t over flow.
  4. Break your alka seltzer into tiny pieces and drop them in one piece at a time. as required and watch your lava lamp come to life.

My Results:

This DIY felt more like a science experiment and as soon as you ran out of tablets it was over. It all went as planned and the end result was exactly as planned.  I was entertained for a short amount of time then I got bored quickly. I probably wouldn’t recommend trying this pin unless it’s for a school project or with kids who might find this more entertaining.

If you have any ideas or suggestions coment on this post and I’ll see if I can do it.  Come back soon to check my next post.

– The Pin Tester